The CodeSourcery ARM Lite Edition is a really good bet. There’s the ridiculous crosstool-NG. My favourite is summon-arm-toolchain which is a nice, readable shell script that handles the download and multi-stage build for you.
I’ve done a little bit of work on it at http://github.com/nzmichaelh/summon-arm-toolchain to tidy up the download process and support for the Linaro ARM toolchain.
]]>There’s a couple of nice things here: the drivers are very thin and not as over-engineered as the ST Standard Peripheral Library, and there’s a nice, well defined license instead of the ambiguous one that ST use. And for bonus geek points they’ve used the very open MIT/X11 license.
]]>Two different ones have popped up on mailing lists recently:
The Canterbury Innovation Incubator is along similar lines.
One on the Riccarton side of town would be nice. I wonder if NZi3 have anything…
]]>The following tests are for a sample size of one, and therefore aren’t very scientific, but here goes:
| Test | Host | Device | Host’s relative performance | Normalised |
|---|---|---|---|---|
| Compile ffmpeg | 140 s | 2690 s | 19.2 x (9.6 x per core) | 2.9 x |
| BogoMips | 4787 | 494 | 9.8 x | 2.9 x |
| Python looper | 12.3 million/s | 1.32 million/s | 9.3 x | 2.8 x |
The normalised column is corrected for the 3.33 times difference in MHz. Incidentally, distcc did a great job of speeding up the ffmpeg build. Sharing the build across two boards brought the compilation down to 1493 s for a 1.8 x improvement.
The configuration was:
- The host is a Lenovo R500 laptop with a 2.4 GHz P8600 Core 2 Duo
- The device is a KwikByte with a 720 MHz OMAP3530
- Ubuntu 10.04 LTS on both
- gcc version 4.4.3 (Ubuntu 4.4.3-4ubuntu5)
- Python 2.6.5-0ubuntu1
- ffmpeg 0.6
The ‘Compile ffmpeg’ test involves compiling ffmpeg using the default target configuration. This may have lead to more or less code being compiled between the two machines. The host build involved a ‘make -sj4′ to keep both cores taxed. The device involved a ‘make -sj3′ to keep the CPU busy.
The ‘BogoMips’ test is the BogoMips value reported by the Linux kernel at startup.
The ‘Python looper’ test is a simple ‘for i in range(500000) …’ test that counts the number of loops performed in 10 s.
I’m fairly sure the tests were CPU bound. Note that the TDP of the P8600 is 25 W and the OMAP3530 is (as best as I can tell) 1.5 W. The 2.9 x drop in performance is made up for by a 16.7 x drop in power. I wonder how much power the host was actually using?
Update: I had a quick go with the same tests using qemu-maemo to simulate a Cortex-A8 based board. My P8600 does 0.54 million loops/s while a triple-core AMD Phenom 8650 achieved 0.35. Running a qemu instance on each core on both machines gives me the equivalent of a 1.2 GHz board, which isn’t really worth the effort.
Update: I had a go with the Python test on a Atom N450 1.66 GHz machine in 64 bit mode. It scored 3.48 million loops/s or 2.45 x slower per clock than the host. On this (very poor) benchmark, the Atom is 1.14 x faster per clock than the ARM. Not surprising when you consider that the Python test probably has poor memory locality and the Atom has a 512 k cache vs the ARMs 32 k.
]]>wrdk is a pre-built toolchain, libraries, set of examples, and simple
serial loader that makes developing applications for the Openmoko
WikiReader a little bit easier. Included is fairly high level access
to most of the hardware including the file system, LCD, buttons, and
touch screen.
The development cycle is pretty easy: write your app, build it, copy
it over to a SD card, and pick the icon off a menu to run it. The
serial loader, along with a modified WikiReader and custom cable,
speeds this up by letting you reset the device and load a new program
straight from your desktop machine.
Binaries are available for Linux and Windows. See
for more.
I’m tempted to offer a pre-modified WikiReader and download cable to
help those who aren’t electronically inclined. Please contact me if
you’d be interested.
My son and I made this in a couple of hours. There’s a blitting glitch when the ball hits the right bumper but apart from that it’s looking pretty good.
]]>The rig at the top is a 3.3 V serial level converter that hooks into the debug connector. The WikiReader boots a small serial loader from the SD card so that I can quickly load apps in from the development machine. The ball starts life as a three colour PNG that is split out into an image and mask. The mask lets you draw images on top of each other without destroying the one underneath.
Next step is to turn the image drawing code into a more generic blit and have a look at the performance.
]]>I can think of a range of uses for the device so far:
- A scrollable map with details on the towns for when we’re travelling with the kids
- The display for a ATMEGA based simple multimeter and oscilloscope
- Sunlight viewable training tool for a friend who rows
…and anything really that needs a nice, small, portable display.
The next step is to figure out how to open the case and hook into the debug header. Swapping an SD card in and out is acceptable, but spending some time making the tools better is always worthwhile.
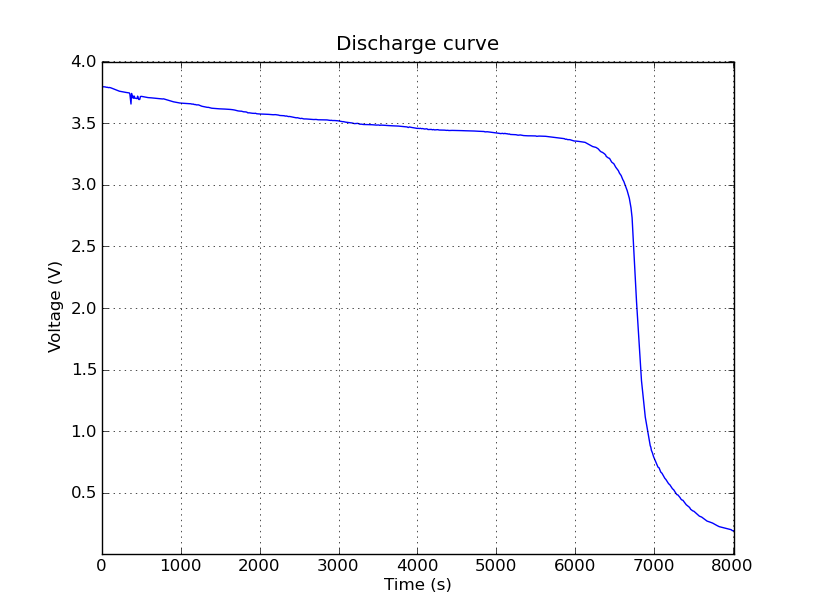
]]>The battery is a single cell 3.7 V with a 3500 mAh capacity. I charged it at 1 A using a Celectra EFLC3000 peak detect charger and then discharged it through a simple 1.95 Ohm resistive load. LiPo batteries have a very flat discharge curve so I’d expect to see a constant supply of power.
Power is V^2 / R so the load should be sinking about 6.6 W. It’s surprising how hot things get even at such a low power.
The data was captured using a Syscomp CGR-101 PC based oscilloscope. The scope software has a special data recorder mode that records the current screen worth of data off to a CSV file every ‘n’ seconds. A quick Python script gathered the files, converted the timestamps, and calcuated the mean of each file. A quick matplotlib script then turned this into a nice looking graph:
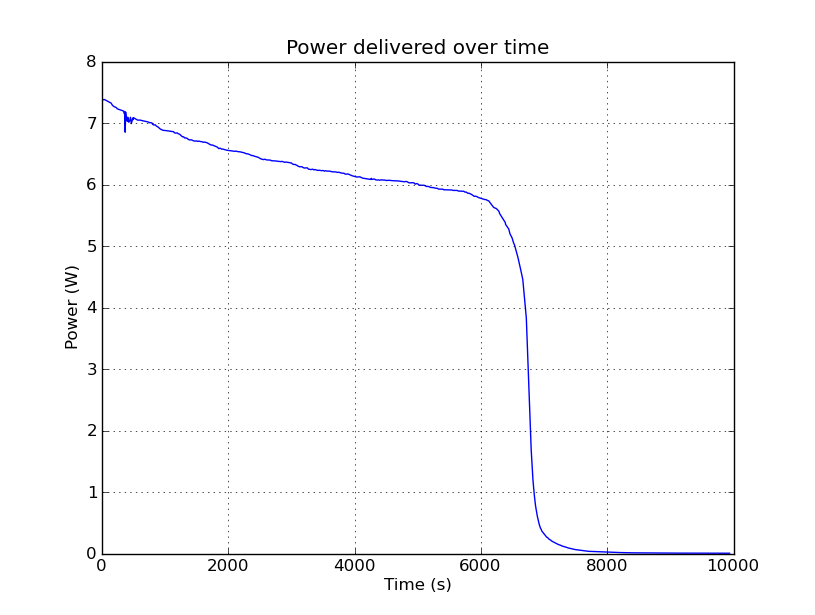
A bit more scripting gives the instantaneous power:
Rectangular integration shows that the battery delivered 42703 J or 11.9 Wh. It’s rated at 3500 [email protected] V or 13.0 Wh. Similar and probably within the limits of the experiment.
I’m worried about the load though. Resistance increases with temperature and the load gets quite hot. I measured 2.5 Ohms shortly after starting the second run which suggests the actual capacity is more like 9.6 Wh. I may also have been discharging the battery too fast as the effective capacity drops off with discharge rate.
]]>

